Runbook
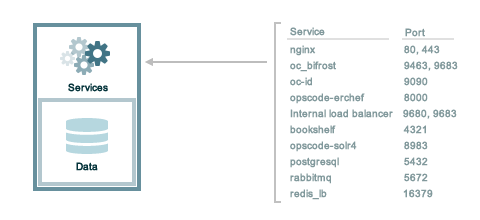
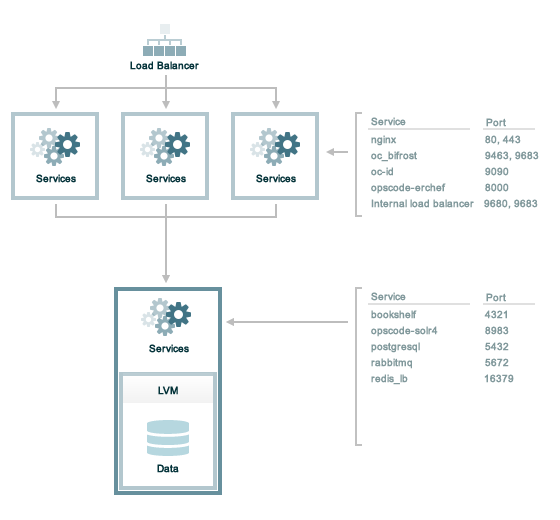
The following diagram shows the various components that are part of a Chef Infra Server deployment and how they relate to one another.

| Component | Description |
|---|---|
Bookshelf | Bookshelf is used to store cookbook content—files, templates, and so on—that have been uploaded to the Chef Infra Server as part of a cookbook version. Cookbook content is stored by content checksum. If two different cookbooks or different versions of the same cookbook include the same file or template, Bookshelf will store that file only once. The cookbook content managed by Bookshelf is stored in flat files and is separated from the Chef Infra Server and search index repositories. All cookbooks are stored in a dedicated repository. |
| Erchef | Erchef is a complete rewrite of the core API for the Chef Infra Server, which allows it to be faster and more scalable than previous versions. The API itself is still compatible with the original Ruby-based Chef Infra Server, which means that cookbooks and recipes that were authored for the Ruby-based Chef Infra Server will continue to work on the Erlang-based Chef Infra Server. Chef Infra Client is still written in Ruby. Note Even though the Chef Infra Server is authored in Erlang, writing code in Erlang is NOT a requirement for using Chef. |
Messages | |
| Nginx | Nginx is an open-source HTTP and reverse proxy server that is used as the front-end load balancer for the Chef Infra Server. All requests to the Chef Infra Server API are routed through Nginx. |
| PostgreSQL | PostgreSQL is the data storage repository for the Chef Infra Server. |
The following sections detail how to monitor the server, manage log files, manage services, manage firewalls and ports, configure SSL, tune server configuration settings, and backup and restore data.
Monitor
Monitoring the Chef Infra Server involves two types of checks: application and system. In addition monitoring the HTTP requests that workstations and nodes are making to the Chef Infra Server and per-disk data storage volumes is recommended.
Monitoring Priorities
The following sections describe the priorities for monitoring of the Chef Infra Server. In particular, running out of disk space is the primary cause of failure.
Disks
Over time, and with enough data, disks will fill up or exceed the per-disk quotas that may have been set for them and they will not be able to write data. A disk that is not able to write data will not be able to support certain components of the Chef Infra Server, such as PostgreSQL, service log files, and deleted file handles. Monitoring disk usage is the best way to ensure that disks don’t fill up or exceed their quota.
Use the following commands to monitor global disk usage on a Chef Infra Server with a typical installation:
du -sh /var/opt/opscode
and:
du -sh /var/log/opscode
To keep the Chef Infra Server healthy, both /var/opt/opscode and
/var/log/opscode should never exceed 80% use. In situations where disk
space grows at a rapid pace, it may be preferable to shut down the Chef
Infra Server and contact Chef support.
The following components should be monitored for signs that disks may be rapidly filling up:
- PostgreSQL PostgreSQL is the data store for the Chef Infra Server.
- Log files If
/var/log/opscodeis taking up a lot of disk space, ensure that the Chef Infra Server log rotation cron job is running without errors. These errors can be found in/var/log/messages,/var/log/syslogand/or the root user’s local mail. - Deleted file handles Running processes with file handles
associated with one (or more) deleted files will prevent the disk
space being used by the deleted files from being reclaimed. Use the
sudo lsof | grep '(deleted)'command to find all deleted file handles.
Application Checks
Application-level checks should be done periodically to ensure that there is enough disk space, enough memory, and that the front-end and back-end services are communicating.
Erlang
Many components of the Chef Infra Server are written using Erlang and run on the BEAM virtual machine. One feature of Erlang and BEAM is the ability to interact with the running service using a command shell. For example:
cd /opt/opscode/embedded
  export PATH=$PATH:/opt/opscode/bin:/opt/opscode/embedded/bin
  bin/erl -setcookie service_name -name me@127.0.0.1 -remsh service_name@127.0.0.1
where service_name is bifrost or erchef. This command will then
open a shell that is connected to the Erchef processes:
Erlang R15B02 (erts-5.9.2) [source] [64-bit] ...
Warning
To connect to the oc_bifrost service, use the following command:
erl -setcookie oc_bifrost -name me@127.0.0.1 -remsh oc_bifrost@127.0.0.1
To connect to the opscode-erchef service, use the following command:
erl -setcookie erchef -name me@127.0.0.1 -remsh erchef@127.0.0.1
To disconnect from the shell, use the following key sequence CTRL-g,
q, and then ENTER.
The output from the shell after the CTRL-g looks similar to:
(erchef@127.0.0.1)1>
User switch command
then enter q, and then hit ENTER to exit the shell.
Some commands should not be entered when interacting with a running service while using the command shell, including:
q()kills the Erlang nodeinit:stop()exitorexit()does nothing
eper toolsAs root on the Chef Infra Server, point to the bundled eper package of
debugging tools. Replace the 2nd and 5th path entries and the X.XX.X
value in the following path with the items that occur on the system.
export ERL_LIB=:/opt/{chef-server,opscode}/embedded/service/{erchef,opscode-erchef}/lib/eper-X.XX.X/ebin/
Open an Erlang command shell to begin diagnosing service issues on the Chef Infra Server:
Eshell V5.10.4  (abort with ^G)
(erchef@127.0.0.1)1>
The dtop tool presents a view on the Erlang virtual machine that is
similar to the linuxdagnostic command. The period at the end of the
dtop command is required for the command to take effect.
(erchef@127.0.0.1)1> dtop:start().
To stop the dtop command, run:
(erchef@127.0.0.1)1> dtop:stop().
To disconnect from the shell, use the following key sequence CTRL-g,
q, and then ENTER.
The output from the shell after the CTRL-g looks similar to:
(erchef@127.0.0.1)1>
User switch command
then enter q, and then hit ENTER to exit the shell.
Nginx
Use Nginx to monitor for services that may be returning 504 errors. Use the following command on a front-end machine:
grep 'HTTP/1.1" 504' /var/log/opscode/nginx/access.log
and then extract the URLs and sort them by uniq count:
grep 'HTTP/1.1" 504' nginx-access.log | cut -d' ' -f8 | sort | uniq -c | sort
In a large installation, restricting these results to a subset of results may be necessary:
tail -10000 nginx-access.log | grep 'HTTP/1.1" 504' | cut -d' ' -f8 | sort | uniq -c | sort
PostgreSQL
psql is the management tool for PostgreSQL. It can be used to obtain information about data stored in PostgreSQL. For more information about psql, see http://www.postgresql.org/docs/manuals/, and then the doc set appropriate for the version of PostgreSQL being used.
To connect to the PostgreSQL database, run the following command:
cd /opt/opscode/embedded/service/postgresql/
  export PATH=$PATH:/opt/opscode/bin:/opt/opscode/embedded/bin
  bin/psql -U opscode_chef
Warning
Redis
The redis_lb service located on the back end machine handles requests that are made from the Nginx service that is located on all front end machines in a Chef Infra Server cluster.
In the event of a disk full condition for the Redis data store, the
dump.rdb (the primary data store .rdb used by Redis) can become
corrupt and saved as a zero byte file.
When this occurs, after the redis_lb service started, it’s logs will show a statement similar to the following:
2015-03-23_16:11:31.44256 [11529] 23 Mar 16:10:09.624 # Server started, Redis version 2.8.2
2015-03-23_16:11:31.44256 [11529] 23 Mar 16:10:09.624 # WARNING overcommit_memory is set to 0! Background save may fail under low memory condition. To fix this issue add 'vm.overcommit_memory = 1' to /etc/sysctl.conf and then reboot or run the command 'sysctl vm.overcommit_memory=1' for this to take effect.
2015-03-23_16:11:31.44257 [11529] 23 Mar 16:11:31.438 # Short read or OOM loading DB. Unrecoverable error, aborting now.
The dump.rdb file will be empty:
ls -al /var/opt/opscode/redis_lb/data/
total 20
drwxr-x--- 2 opscode opscode 4096 Mar 23 15:58 .
drwxr-x--- 4 opscode opscode 4096 Dec 22 18:59 ..
-rw-r--r-- 1 opscode opscode    0 Mar 23 15:58 dump.rdb
This situation is caused by a bug in Redis where saves are allowed to succeed even when the disk has been full for some time, and not just on edge cases where the disk becomes full as Redis is writing. To fix this issue, do the following:
Stop the redis_lb service:
chef-server-ctl stop redis_lbRemove the corrupt files:
cd /var/opt/opscode/redis_lb/data
rm -fr *rdb
Start the redis_lb service:
chef-server-ctl start redis_lb

less /var/log/opscode/redis_lb/current
2015-03-23_17:05:18.82516 [28676] 23 Mar 17:05:18.825 * The server is now ready to accept connections on port 16379
Reconfigure the Chef Infra Server to re-populate Redis:
chef-server-ctl reconfigureVerify that Redis is re-populated, as indicated by the key
dl_default:/opt/opscode/embedded/bin/redis-cli -p 16379 keys \* 1) "dl_default"
System Checks
System-level checks should be done for the ports and services status.
chef-backend-ctl status
The chef-backend-ctl status subcommand is used to check the status of
services running in the Chef Backend server
topology. This command will verify the status
of the following services on the node it is run on:
leaderlpostgresqletcdepmdelasticsearch
It will also check on the status of other nodes in the cluster, from the current node’s perspective. For example:
chef-backend-ctl status
Service Local Status Time in State Distributed Node Status
leaderl running (pid 1191) 53d 15h 11m 12s leader: 1; waiting: 0; follower: 2;    total: 3
epmd running (pid 1195) 53d 15h 11m 12s status: local-only
etcd running (pid 1189) 53d 15h 11m 12s health: green; healthy nodes: 3/3
postgresql running (pid 40686) 0d 12h 36m 23s leader: 1; offline: 0; syncing: 0;    synced: 2
elasticsearch running (pid 47423) 0d 12h 18m 6s state: green; nodes online: 3/3

System Local Status Distributed Node Status
disks /var/log/chef-backend: OK; /var/opt/chef-backend: OK health: green; healthy    nodes: 3/3
More information about each service can be found in the individual
service logs in /var/opt/chef-backend/.
opscode-authz
The authz API provides a high-level view of the health of the
opscode-authz service with a simple endpoint: _ping. This endpoint
can be accessed using cURL and GNU Wget. For example:
curl http://localhost:9463/_ping
This command typically prints a lot of information. Use Python to use pretty-print output:
curl http://localhost:9463/_ping | python -mjson.tool
opscode-erchef
The status API provides a high-level view of the health of the system
with a simple endpoint: _status. This endpoint can be accessed using
cURL and GNU Wget. For example:
curl http://localhost:8000/_status
which will return something similar to:
{
  "status":"pong",
  "upstreams":{"upstream_service":"pong","upstream_service":"fail",...},
}
For each of the upstream services, pong or fail is returned. The
possible upstream names are:
chef_sql(for the postgresql service)oc_chef_authz(for the opscode-authz service)
If any of the status values return fail, this typically means the Chef
Infra Server is unavailable for that service.
Nodes, Workstations
If a client makes an HTTP request to the server that returns a non-specific error message, this is typically an issue with the opscode-chef or opscode-erchef services. View the full error message for these services in their respective log files. The error is most often a stacktrace from the application error. In some cases, the error message will clearly indicate a problem with another service, which can then be investigated further. For non-obvious errors, please contact Chef support services.
Log Files
All logs generated by the Chef Infra Server can be found in
/var/log/opscode. Each service enabled on the system also has a
sub-directory in which service-specific logs are located, typically
found in /var/log/opscode/service_name.
View Log Files
The Chef Infra Server has built-in support for easily tailing the logs that are generated. To view all the logs being generated on the Chef Infra Server, enter the following command:
chef-server-ctl tail
To view logs for a specific service:
chef-server-ctl tail SERVICENAME
where SERVICENAME should be replaced with name of the service for
which log files will be viewed.
tail Log Files
The tail subcommand is used to follow all of the Chef Infra Server
logs for all services. This command can also be run for an individual
service by specifying the name of the service in the command.
This subcommand has the following syntax:
chef-server-ctl tail SERVICE_NAME
where SERVICE_NAME represents the name of any service that is listed
after running the service-list subcommand.
Another common approach to tailing the log files for a service is to use
the system utility tail. For example:
tail -50f /var/log/opscode/opscode-erchef/current
Supervisor
Supervisor logs are created and managed directly by the service
supervisor, and are automatically rotated when the current log file
reaches 1,000,000 bytes. 10 log files are kept. The latest supervisor
log is always located in /var/log/service_name/current and
rotated logs have a filename starting with @ followed by a precise
tai64n timestamp based on when the file was rotated.
Supervisor logs are available for the following services:
- bifrost
- bookshelf
- elasticsearch
- nginx
- opscode-erchef
- postgresql
- redis
nginx, access
Nginx is an important entry point for data on the Chef Infra Server,
which means that debugging efforts frequently start with analyzing the
nginx service’s access.log file. This log contains every HTTP
request made to the front-end machine and can be very useful when
investigating request rates and usage patterns. The following is an
example log entry:
175.185.9.6 - - [12/Jul/2013:15:56:54 +0000] "GET
/organizations/exampleorg/data/firewall/nova_api HTTP/1.1" 200
"0.850" 452 "-" "Chef Client/0.10.2 (ruby-1.8.7-p302; ohai-0.6.4;
x86_64-linux; +https://chef.io)" "127.0.0.1:9460" "200"
"0.849" "0.10.2" "version=1.0" "some_node.example.com"
"2013-07-12T15:56:40Z" "2jmj7l5rSw0yVb/vlWAYkK/YBwk=" 985
where important fields in this log include:
- The HTTP status code (
200) - The IP address of the requesting client (
175.185.9.6) - The timestamp (
[12/Jul/2013:15:56:54 +0000]) - The total request time (
"0.850") - The request method (
GET) - The request URL (
/organizations/exampleorg/data/firewall/nova_api)
opscode-erchef, current
The opscode-erchef service’s current.log file contains a history
of stack traces from major application crashes.
opscode-erchef, erchef
The opscode-erchef service’s erchef.log file contains a history of
API requests that have been processed by Erchef. These logs can be
rotated quickly, therefore it is generally best to sort them by date,
and then find the most recently updated log file:
ls -lrt /var/log/opscode/opscode-erchef/erchef.log.*
The following is an example log entry:
2013-08-06T08:54:32Z erchef@127.0.0.1 INFO org_name=srwjedoqqoypgmvafmoi; req_id=g3IAA2QAEGVyY2hlZkAx
where important fields in this log include:
- The HTTP method (
POST) - The HTTP path (
/organizations/srwjedoqqoypgmvafmoi/environments) - The message (
{created,<<"_default">>}) - The organization name (
org_name=srwjedoqqoypgmvafmoi) - The timestamp (
2013-08-06T08:54:32Z) - The name of the user and/or Chef Infra Client which made the request
(
pivotal)
In addition, the log file may contain additional entries that detail the amounts of time spent interacting with other services:
rdbms_time(the time spent talking to the postgresql service)req_time(the request time)solr_time(the time spent talking to the opscode-solr service)
Application
Application logs are created by the services directly, and may require log rotation policies to be applied based on organizational goals and the platform(s) on which the services are running.
nginx
The nginx service creates both supervisor and administrator logs. The
administrator logs contain both access and error logs for each virtual
host utilized by the Chef Infra Server. Each of the following logs
require external log rotation.
| Logs | Description |
|---|---|
/var/log/opscode/nginx/access.log | The Web UI and API HTTP access logs. |
/var/log/opscode/nginx/error.log | The Web UI and API HTTP error logs. |
/var/log/opscode/nginx/internal-account.access.log | The opscode-account internal load-balancer access logs. |
/var/log/opscode/nginx/internal-account.error.log | The opscode-account internal load-balancer error logs. |
/var/log/opscode/nginx/internal-authz.access.log | The opscode-authz internal load-balancer access logs. |
/var/log/opscode/nginx/internal-authz.error.log | The opscode-authz internal load-balancer error logs. |
/var/log/opscode/nginx/internal-chef.access.log | The opscode-chef and opscode-erchef internal load-balancer access logs. |
/var/log/opscode/nginx/internal-chef.error.log | The opscode-chef and opscode-erchef internal load-balancer error logs. |
/var/log/opscode/nginx/nagios.access.log | The nagios access logs. |
/var/log/opscode/nginx/nagios.error.log | The nagios error logs. |
/var/log/opscode/nginx/rewrite-port-80.log | The rewrite logs for traffic that uses HTTP instead of HTTPS. |
To follow the logs for the service:
chef-server-ctl tail nginx
The nginx access log format is as follows:
log_format opscode '$remote_addr - $remote_user [$time_local]  '
  '"$request" $status "$request_time" $body_bytes_sent '
  '"$http_referrer" "$http_user_agent" "$upstream_addr" '
  '"$upstream_status" "$upstream_response_time" "$http_x_chef_version" '
  '"$http_x_ops_sign" "$http_x_ops_userid" "$http_x_ops_timestamp" '
   '"$http_x_ops_content_hash" $request_length';
A sample log line:
192.0.2.0 - - [17/Feb/2012:16:02:42 -0800]
  "GET /organizations/nginx/cookbooks HTTP/1.1" 200
  "0.346" 12 "-"
  "Chef Knife/0.10.4 (ruby-1.9.3-p0;
                      ohai-0.6.10;
                      x86_64-darwin11.2.0;
                      +http://opscode.com
                      )"
  "127.0.0.1:9460" "200" "0.339" "0.10.4"
  "version=1.0" "adam" "2012-02-18T00:02:42Z"
  "2jmj7l5rSw0yVb/vlWAYkK/YBwk=" 871
Field descriptions:
| Field | Description |
|---|---|
$remote_addr | The IP address of the client who made this request. |
$remote_user | The HTTP basic auth user name of this request. |
$time_local | The local time of the request. |
$request | The HTTP request. |
$status | The HTTP status code. |
$request_time | The time it took to service the request. |
$body_bytes_sent | The number of bytes in the HTTP response body. |
$http_referrer | The HTTP referrer. |
$http_user_agent | The user agent of the requesting client. |
$upstream_addr | The upstream reverse proxy used to service this request. |
$upstream_status | The upstream reverse proxy response status code. |
$upstream_response_time | The upstream reverse proxy response time. |
$http_x_chef_version | The version of Chef used to make this request. |
$http_x_ops_sign | The version of the authentication protocol. |
$http_x_ops_userid | The client name that was used to sign this request. |
$http_x_ops_timestamp | The timestamp from when this request was signed. |
$http_x_ops_content_hash | The hash of the contents of this request. |
$request_length | The length of this request. |
Firewalls and Ports
All of the ports used by the Chef Infra Server are TCP ports. Refer to the operating system’s manual or site systems administrators for instructions on how to enable changes to ports, if necessary.
All services must be listening on the appropriate ports. Most monitoring systems provide a means of testing whether a given port is accepting connections and service-specific tools may also be available. In addition, the generic system tool Telnet can also be used to initiate the connection:
telnet HOST_NAME PORT
Note
Standalone
The following sections describe the ports that are required by the Chef Infra Server in a standalone configuration:
A single loopback interface should be configured using the 127.0.0.1
address. This ensures that all of the services are available to the Chef
Infra Server, in the event that the Chef Infra Server attempts to
contact itself from within a front or back end machine. All ports should
be accessible through the loopback interface of their respective hosts.
For a standalone installation, ensure that ports marked as external
(marked as yes in the External column) are open and accessible via
any firewalls that are in use:
| Port | Service Name, Description | External |
|---|---|---|
4321 | bookshelf The bookshelf service is an Amazon Simple Storage Service (S3)-compatible service that is used to store cookbooks, including all of the files—recipes, templates, and so on—that are associated with each cookbook. | no |
80, 443, 9683 | nginx The nginx service is used to manage traffic to the Chef Infra Server, including virtual hosts for internal and external API request/response routing, external add-on request routing, and routing between front- and back-end components.Note Port 9683 is used to internally load balance the oc_bifrost service. | yes |
9463 | oc_bifrost The oc_bifrost service ensures that every request to view or manage objects stored on the Chef Infra Server is authorized. | |
9090 | oc-id The oc-id service enables OAuth 2.0 authentication to the Chef Infra Server by external applications, including Chef Supermarket. OAuth 2.0 uses token-based authentication, where external applications use tokens that are issued by the oc-id provider. No special credentials—webui_priv.pem or privileged keys—are stored on the
external application. | |
8000 | opscode-erchef The opscode-erchef service is an Erlang-based service that is used to handle Chef Infra Server API requests to the following areas within the Chef Infra Server:
| |
5432 | postgresql The postgresql service is used to store node, object, and user data. | |
9200 | elasticsearch The elasticsearch service is used to create the search indexes used for searching objects like nodes, data bags, and cookbooks. (This service ensures timely search results via the Chef Infra Server API; data that is used by the Chef platform is stored in PostgreSQL.) | |
16379 | redis_lb Key-value store used in conjunction with Nginx to route requests and populate request data used by the Chef Infra Server. |
Tiered
The following sections describe the ports that are required by the Chef Infra Server in a tiered configuration:
A single loopback interface should be configured using the 127.0.0.1
address. This ensures that all of the services are available to the Chef
Infra Server, in the event that the Chef Infra Server attempts to
contact itself from within a front or back end machine. All ports should
be accessible through the loopback interface of their respective hosts.
Front End
For front-end servers, ensure that ports marked as external (marked as
yes in the External column) are open and accessible via any
firewalls that are in use:
| Port | Service Name, Description | External |
|---|---|---|
80, 443, 9683 | nginx The nginx service is used to manage traffic to the Chef Infra Server, including virtual hosts for internal and external API request/response routing, external add-on request routing, and routing between front- and back-end components. Note Port 9683 is used to internally load balance the oc_bifrost service. | yes |
9463 | oc_bifrost The oc_bifrost service ensures that every request to view or manage objects stored on the Chef Infra Server is authorized. | |
9090 | oc-id The oc-id service enables OAuth 2.0 authentication to the Chef Infra
Server by external applications, including Chef Supermarket. OAuth 2.0
uses token-based authentication, where external applications use tokens
that are issued by the oc-id provider. No special
credentials— | |
8000 | opscode-erchef The opscode-erchef service is an Erlang-based service that is used to handle Chef Infra Server API requests to the following areas within the Chef Infra Server:
|
Back End
For back-end servers in a tiered Chef Infra Server installation, ensure
that ports marked as external (marked as yes in the External
column) are open and accessible via any firewalls that are in use:
| Port | Service Name, Description | External |
|---|---|---|
80, 443, 9683 | nginx The nginx service is used to manage traffic to the Chef Infra Server, including virtual hosts for internal and external API request/response routing, external add-on request routing, and routing between front- and back-end components. Note Port 9683 is used to internally load balance the oc_bifrost service. | yes |
9463 | oc_bifrost The oc_bifrost service ensures that every request to view or manage objects stored on the Chef Infra Server is authorized. | |
9200 | elasticsearch The elasticsearch service is used to create the search indexes used for searching objects like nodes, data bags, and cookbooks. (This service ensures timely search results via the Chef Infra Server API; data that is used by the Chef platform is stored in PostgreSQL.) | |
5432 | postgresql The postgresql service is used to store node, object, and user data. | |
16379 | redis_lb Key-value store used in conjunction with Nginx to route requests and populate request data used by the Chef Infra Server. | |
4321 | bookshelf The bookshelf service is an Amazon Simple Storage Service (S3)-compatible service that is used to store cookbooks, including all of the files—recipes, templates, and so on—that are associated with each cookbook. | |
8000 | opscode-erchef The opscode-erchef service is an Erlang-based service that is used to handle Chef Infra Server API requests to the following areas within the Chef Infra Server:
|
Chef Push Jobs
TCP protocol ports 10000, 10002 and 10003. 10000 is the default heartbeat port, 10002 is the default command port, 10003 is the default API port. These may be configured in the Chef Push Jobs configuration file. The command port allows Chef Push Jobs clients to communicate with the Chef Push Jobs server and also allows chef server components to communicate with the push-jobs server. In a configuration with both front and back ends, this port only needs to be open on the back end servers. The Chef Push Jobs server waits for connections from the Chef Push Jobs client, and never initiates a connection to a Chef Push Jobs client. In situations where the chef server has a non-locally-assigned public address (like a cloud deployment / or behind NAT ) the api port should be added to the network security configuration for the chef server to connect to itself on the public IP, if that is what the chef server hostname points to.
Services
The Chef Infra Server has a built in process supervisor, which ensures that all of the required services are in the appropriate state at any given time. The supervisor starts two processes per service.
Service Subcommands
This command has a built in process supervisor that ensures all of the
required services are in the appropriate state at any given time. The
supervisor starts two processes per service and provides the following
subcommands for managing services: hup, int, kill, once,
restart, service-list, start, status, stop, tail, and
term.
hup
The hup subcommand is used to send a SIGHUP to all services. This
command can also be run for an individual service by specifying the name
of the service in the command.
This subcommand has the following syntax:
chef-server-ctl hup SERVICE_NAME
where SERVICE_NAME represents the name of any service that is listed
after running the service-list subcommand.
int
The int subcommand is used to send a SIGINT to all services. This
command can also be run for an individual service by specifying the name
of the service in the command.
This subcommand has the following syntax:
chef-server-ctl int SERVICE_NAME
where SERVICE_NAME represents the name of any service that is listed
after running the service-list subcommand.
kill
The kill subcommand is used to send a SIGKILL to all services. This
command can also be run for an individual service by specifying the name
of the service in the command.
This subcommand has the following syntax:
chef-server-ctl kill SERVICE_NAME
where SERVICE_NAME represents the name of any service that is listed
after running the service-list subcommand.
once
The supervisor for the Chef Infra Server is configured to restart any
service that fails, unless that service has been asked to change its
state. The once subcommand is used to tell the supervisor to not
attempt to restart any service that fails.
This command is useful when troubleshooting configuration errors that
prevent a service from starting. Run the once subcommand followed by
the status subcommand to look for services in a down state and/or to
identify which services are in trouble. This command can also be run for
an individual service by specifying the name of the service in the
command.
This subcommand has the following syntax:
chef-server-ctl once SERVICE_NAME
where SERVICE_NAME represents the name of any service that is listed
after running the service-list subcommand.
restart
The restart subcommand is used to restart all services enabled on the
Chef Infra Server or to restart an individual service by specifying the
name of that service in the command.
Warning
When running the Chef Infra Server in a high availability configuration, restarting all services may trigger failover.
This subcommand has the following syntax:
chef-server-ctl restart SERVICE_NAME
where SERVICE_NAME represents the name of any service that is listed
after running the service-list subcommand. When a service is
successfully restarted the output should be similar to:
ok: run: service_name: (pid 12345) 1s
service-list
The service-list subcommand is used to display a list of all available
services. A service that is enabled is labeled with an asterisk (*).
This subcommand has the following syntax:
chef-server-ctl service-list
start
The start subcommand is used to start all services that are enabled in
the Chef Infra Server. This command can also be run for an individual
service by specifying the name of the service in the command.
This subcommand has the following syntax:
chef-server-ctl start SERVICE_NAME
where SERVICE_NAME represents the name of any service that is listed
after running the service-list subcommand. When a service is
successfully started the output should be similar to:
ok: run: service_name: (pid 12345) 1s
The supervisor for the Chef Infra Server is configured to wait seven
seconds for a service to respond to a command from the supervisor. If
you see output that references a timeout, it means that a signal has
been sent to the process, but that the process has yet to actually
comply. In general, processes that have timed out are not a big concern,
unless they are failing to respond to the signals at all. If a process
is not responding, use a command like the kill subcommand to stop the
process, investigate the cause (if required), and then use the start
subcommand to re-enable it.
status
The status subcommand is used to show the status of all services
available to the Chef Infra Server. The results will vary based on the
configuration of a given server. This subcommand has the following
syntax:
chef-server-ctl status
and will return the status for all services. Status can be returned for individual services by specifying the name of the service as part of the command:
chef-server-ctl status SERVICE_NAME
where SERVICE_NAME represents the name of any service that is listed
after running the service-list subcommand.
When service status is requested, the output should be similar to:
run: service_name: (pid 12345) 12345s; run: log: (pid 1234) 67890s
where
run:is the state of the service (run:ordown:)service_name:is the name of the service for which status is returned(pid 12345)is the process identifier12345sis the uptime of the service, in seconds
For example:
down: opscode-erchef: (pid 35546) 10s
By default, runit will restart services automatically when the services
fail. Therefore, runit may report the status of a service as run: even
when there is an issue with that service. When investigating why a
particular service is not running as it should be, look for the services
with the shortest uptimes. For example, the list below indicates that
the opscode-erchef should be investigated further:
run: oc-id
run: opscode-chef: (pid 4327) 13671s; run: log: (pid 4326) 13671s
run: opscode-erchef: (pid 5383) 5s; run: log: (pid 4382) 13669s
A typical status line for a service that is running any of the Chef Infra Server front-end services is similar to the following:
run: name_of_service: (pid 1486) 7819s; run: log: (pid 1485) 7819s
where:
rundescribes the state in which the supervisor attempts to keep processes. This state is eitherrunordown. If a service is in adownstate, it should be stoppedname_of_serviceis the service name, for example:opscode-erchef(pid 1486) 7819s;is the process identifier followed by the amount of time (in seconds) the service has been runningrun: log: (pid 1485) 7819sis the log process. It is typical for a log process to have a longer run time than a service; this is because the supervisor does not need to restart the log process in order to connect the supervised process
If the service is down, the status line will appear similar to the following:
down: opscode-erchef: 3s, normally up; run: log: (pid 1485) 8526s
where
downindicates that the service is in a down state3s, normally up;indicates that the service is normally in a run state and that the supervisor would attempt to restart this service after a reboot
stop
The stop subcommand is used to stop all services enabled on the Chef
Infra Server. This command can also be run for an individual service by
specifying the name of the service in the command.
This subcommand has the following syntax:
chef-server-ctl stop SERVICE_NAME
where SERVICE_NAME represents the name of any service that is listed
after running the service-list subcommand. When a service is
successfully stopped the output should be similar to:
ok: down: service_name: 0s, normally up
For example:
chef-server-ctl stop
will return something similar to:
ok: down: nginx: 393s, normally up
ok: down: opscode-chef: 391s, normally up
ok: down: opscode-erchef: 391s, normally up
ok: down: opscode-solr4: 389s, normally up
ok: down: postgresql: 388s, normally up
ok: down: redis_lb: 387s, normally up
tail
The tail subcommand is used to follow all of the Chef Infra Server
logs for all services. This command can also be run for an individual
service by specifying the name of the service in the command.
This subcommand has the following syntax:
chef-server-ctl tail SERVICE_NAME
where SERVICE_NAME represents the name of any service that is listed
after running the service-list subcommand.
term
The term subcommand is used to send a SIGTERM to all services. This
command can also be run for an individual service by specifying the name
of the service in the command.
This subcommand has the following syntax:
chef-server-ctl term SERVICE_NAME
where SERVICE_NAME represents the name of any service that is listed
after running the service-list subcommand.
List of Services
The following services are part of the Chef Infra Server:
- bifrost
- bookshelf
- elasticsearch
- nginx
- opscode-erchef
- postgresql
- redis-lb
bifrost
The oc_bifrost service ensures that every request to view or manage objects stored on the Chef Infra Server is authorized.
statusTo view the status for the service:
chef-server-ctl status bifrost
to return something like:
run: bifrost: (pid 1234) 123456s; run: log: (pid 5678) 789012s
To start the service:
chef-server-ctl start bifrost
To stop the service:
chef-server-ctl stop bifrost
To restart the service:
chef-server-ctl restart bifrost
to return something like:
ok: run: bifrost: (pid 1234) 1234s
To kill the service (send a SIGKILL command):
chef-server-ctl kill bifrost
To run the service, but not restart it (if the service fails):
chef-server-ctl once bifrost
To follow the logs for the service:
chef-server-ctl tail bifrost
bookshelf
The bookshelf service is an Amazon Simple Storage Service (S3)-compatible service that is used to store cookbooks, including all of the files—recipes, templates, and so on—that are associated with each cookbook.
statusTo view the status for the service:
chef-server-ctl status bookshelf
to return something like:
run: bookshelf: (pid 1234) 123456s; run: log: (pid 5678) 789012s
To start the service:
chef-server-ctl start bookshelf
To stop the service:
chef-server-ctl stop bookshelf
To restart the service:
chef-server-ctl restart bookshelf
to return something like:
ok: run: bookshelf: (pid 1234) 1234s
To kill the service (send a SIGKILL command):
chef-server-ctl kill bookshelf
To run the service, but not restart it (if the service fails):
chef-server-ctl once bookshelf
To follow the logs for the service:
chef-server-ctl tail bookshelf
Elasticsearch
statusTo view the status for the service:
chef-server-ctl status elasticsearch
to return something like:
elasticsearch: (pid 12345) 1s; run: log: (pid 5678) 123456s
To start the service:
chef-server-ctl start elasticsearch
to return something like:
ok: run: elasticsearch: (pid 5678) 0s
To stop the service:
chef-server-ctl stop elasticsearch
to return something like:
ok: down: elasticsearch: 123456s, normally up
To restart the service:
chef-server-ctl restart elasticsearch
to return something like:
ok: run: elasticsearch: (pid 56789) 1s
To kill the service (send a SIGKILL command):
chef-server-ctl kill elasticsearch
chef-server-ctl once elasticsearch
To follow the logs for the service:
chef-server-ctl tail elasticsearch
nginx
The nginx service is used to manage traffic to the Chef Infra Server, including virtual hosts for internal and external API request/response routing, external add-on request routing, and routing between front- and back-end components.
statusTo view the status for the service:
chef-server-ctl status nginx
to return something like:
run: nginx: (pid 1234) 123456s; run: log: (pid 5678) 789012s
To start the service:
chef-server-ctl start nginx
To stop the service:
chef-server-ctl stop nginx
To restart the service:
chef-server-ctl restart nginx
to return something like:
ok: run: nginx: (pid 1234) 1234s
To kill the service (send a SIGKILL command):
chef-server-ctl kill nginx
To run the service, but not restart it (if the service fails):
chef-server-ctl once nginx
To follow the logs for the service:
chef-server-ctl tail nginx
opscode-erchef
The opscode-erchef service is an Erlang-based service that is used to handle Chef Infra Server API requests to the following areas within the Chef Infra Server:
- Cookbooks
- Data bags
- Environments
- Nodes
- Roles
- Sandboxes
- Search
To view the status for the service:
chef-server-ctl status opscode-erchef
to return something like:
run: opscode-erchefs: (pid 1234) 123456s; run: log: (pid 5678) 789012s
To start the service:
chef-server-ctl start opscode-erchef
To stop the service:
chef-server-ctl stop opscode-erchef
To restart the service:
chef-server-ctl restart opscode-erchef
to return something like:
ok: run: opscode-erchef: (pid 1234) 1234s
To kill the service (send a SIGKILL command):
chef-server-ctl kill opscode-erchef
To run the service, but not restart it (if the service fails):
chef-server-ctl once opscode-erchef
To follow the logs for the service:
chef-server-ctl tail opscode-erchef
postgresql
The postgresql service is used to store node, object, and user data.
statusTo view the status for the service:
chef-server-ctl status postgresql
to return something like:
run: postgresql: (pid 1234) 123456s; run: log: (pid 5678) 789012s
To start the service:
chef-server-ctl start postgresql
To stop the service:
chef-server-ctl stop postgresql
To restart the service:
chef-server-ctl restart postgresql
to return something like:
ok: run: postgresql: (pid 1234) 1234s
To kill the service (send a SIGKILL command):
chef-server-ctl kill postgresql
To run the service, but not restart it (if the service fails):
chef-server-ctl once postgresqls
To follow the logs for the service:
chef-server-ctl tail postgresql
redis
Key-value store used in conjunction with Nginx to route requests and populate request data used by the Chef Infra Server.
statusTo view the status for the service:
chef-server-ctl status redis
to return something like:
run: redis: (pid 1234) 123456s; run: log: (pid 5678) 789012s
To start the service:
chef-server-ctl start redis
To stop the service:
chef-server-ctl stop redis
To restart the service:
chef-server-ctl restart redis
to return something like:
ok: run: redis: (pid 1234) 1234s
To kill the service (send a SIGKILL command):
chef-server-ctl kill name_of_service
To run the service, but not restart it (if the service fails):
chef-server-ctl once redis
To follow the logs for the service:
chef-server-ctl tail name_of_service
Security
This guide covers the security features available in Chef Infra Server.
SSL Certificates
Initial configuration of the Chef Infra Server is done automatically using a self-signed certificate to create the certificate and private key files for Nginx. This section details the process for updating a Chef Infra Server’s SSL certificate.
Automatic Installation (recommended)
The Chef Infra Server can be configured to use SSL certificates by adding the following settings to the server configuration file:
| Setting | Description |
|---|---|
nginx['ssl_certificate'] | The SSL certificate used to verify communication over HTTPS. |
nginx['ssl_certificate_key'] | The certificate key used for SSL communication. |
and then setting their values to define the paths to the certificate and key.
For example:
nginx['ssl_certificate'] = '/etc/pki/tls/certs/your-host.crt'
nginx['ssl_certificate_key'] = '/etc/pki/tls/private/your-host.key'
Save the file, and then run the following command:
sudo chef-server-ctl reconfigure
For more information about the server configuration file, see chef-server.rb.
Manual Installation
SSL certificates can be updated manually by placing the certificate and private key file obtained from the certifying authority in the correct files, after the initial configuration of Chef Infra Server.
The locations of the certificate and private key files are:
/var/opt/opscode/nginx/ca/FQDN.crt/var/opt/opscode/nginx/ca/FQDN.key
Because the FQDN has already been configured, do the following:
Replace the contents of
/var/opt/opscode/nginx/ca/FQDN.crtand/var/opt/opscode/nginx/ca/FQDN.keywith the certifying authority’s files.Reconfigure the Chef Infra Server:
chef-server-ctl reconfigureRestart the Nginx service to load the new key and certificate:
chef-server-ctl restart nginx
Warning
CN in a certificate to be no longer
than 64 characters.SSL Protocols
The following settings are often modified from the default as part of the tuning effort for the nginx service and to configure the Chef Infra Server to use SSL certificates:
nginx['ssl_certificate']The SSL certificate used to verify communication over HTTPS. Default value:
nil.nginx['ssl_certificate_key']The certificate key used for SSL communication. Default value:
nil.nginx['ssl_ciphers']The list of supported cipher suites that are used to establish a secure connection. To favor AES256 with ECDHE forward security, drop the
RC4-SHA:RC4-MD5:RC4:RSAprefix. For example:nginx['ssl_ciphers'] = "HIGH:MEDIUM:!LOW:!kEDH: \ !aNULL:!ADH:!eNULL:!EXP: \ !SSLv2:!SEED:!CAMELLIA: \ !PSK"nginx['ssl_protocols']The SSL protocol versions that are enabled. SSL 3.0 is supported by the Chef Infra Server; however, SSL 3.0 is an obsolete and insecure protocol. Transport Layer Security (TLS)—TLS 1.0, TLS 1.1, and TLS 1.2—has effectively replaced SSL 3.0, which provides for authenticated version negotiation between Chef Infra Client and Chef Infra Server, which ensures the latest version of the TLS protocol is used. For the highest possible security, it is recommended to disable SSL 3.0 and allow all versions of the TLS protocol. For example:
nginx['ssl_protocols'] = 'TLSv1 TLSv1.1 TLSv1.2'
Note
See https://www.openssl.org/docs/man1.0.2/man1/ciphers.html for more
information about the values used with the nginx['ssl_ciphers'] and
nginx['ssl_protocols'] settings.
For example, after copying the SSL certificate files to the Chef Infra
Server, update the nginx['ssl_certificate'] and
nginx['ssl_certificate_key'] settings to specify the paths to those
files, and then (optionally) update the nginx['ssl_ciphers'] and
nginx['ssl_protocols'] settings to reflect the desired level of
hardness for the Chef Infra Server:
nginx['ssl_certificate'] = '/etc/pki/tls/private/name.of.pem'
nginx['ssl_certificate_key'] = '/etc/pki/tls/private/name.of.key'
nginx['ssl_ciphers'] = 'HIGH:MEDIUM:!LOW:!kEDH:!aNULL:!ADH:!eNULL:!EXP:!SSLv2:!SEED:!CAMELLIA:!PSK'
nginx['ssl_protocols'] = 'TLSv1 TLSv1.1 TLSv1.2'
Example: Configure SSL Keys for Nginx
The following example shows how the Chef Infra Server sets up and
configures SSL certificates for Nginx. The cipher suite used by Nginx
is configurable using the
ssl_protocols and ssl_ciphers settings.
ssl_keyfile = File.join(nginx_ca_dir, "#{node['private_chef']['nginx']['server_name']}.key")
ssl_crtfile = File.join(nginx_ca_dir, "#{node['private_chef']['nginx']['server_name']}.crt")
ssl_signing_conf = File.join(nginx_ca_dir, "#{node['private_chef']['nginx']['server_name']}-ssl.conf")

unless ::File.exist?(ssl_keyfile) && ::File.exist?(ssl_crtfile) && ::File.exist?(ssl_signing_conf)
  file ssl_keyfile do
    owner 'root'
    group 'root'
    mode '0755'
    content '/opt/opscode/embedded/bin/openssl genrsa 2048'
    not_if { ::File.exist?(ssl_keyfile) }
  end

  file ssl_signing_conf do
    owner 'root'
    group 'root'
    mode '0755'
    not_if { ::File.exist?(ssl_signing_conf) }
    content <<-EOH
  [ req ]
  distinguished_name = req_distinguished_name
  prompt = no
  [ req_distinguished_name ]
  C                      = #{node['private_chef']['nginx']['ssl_country_name']}
  ST                     = #{node['private_chef']['nginx']['ssl_state_name']}
  L                      = #{node['private_chef']['nginx']['ssl_locality_name']}
  O                      = #{node['private_chef']['nginx']['ssl_company_name']}
  OU                     = #{node['private_chef']['nginx']['ssl_organizational_unit_name']}
  CN                     = #{node['private_chef']['nginx']['server_name']}
  emailAddress           = #{node['private_chef']['nginx']['ssl_email_address']}
  EOH
  end

  ruby_block 'create crtfile' do
    block do
      r = Chef::Resource::File.new(ssl_crtfile, run_context)
      r.owner 'root'
      r.group 'root'
      r.mode '0755'
      r.content "/opt/opscode/embedded/bin/openssl req -config '#{ssl_signing_conf}' -new -x509 -nodes -sha1 -days 3650 -key '#{ssl_keyfile}'"
      r.not_if { ::File.exist?(ssl_crtfile) }
      r.run_action(:create)
    end
  end
end
Knife, Chef Infra Client
Chef Server 12 and later enables SSL verification by default for all requests made to the server, such as those made by knife and Chef Infra Client. The certificate that is generated during the installation of the Chef Infra Server is self-signed, which means the certificate is not signed by a trusted certificate authority (CA) that ships with Chef Infra Client. The certificate generated by the Chef Infra Server must be downloaded to any machine from which knife and/or Chef Infra Client will make requests to the Chef Infra Server.
For example, without downloading the SSL certificate, the following knife command:
knife client list
responds with an error similar to:
ERROR: SSL Validation failure connecting to host: chef-server.example.com ...
ERROR: OpenSSL::SSL::SSLError: SSL_connect returned=1 errno=0 state=SSLv3 ...
This is by design and will occur until a verifiable certificate is added to the machine from which the request is sent.
See Chef Infra Client SSL Certificates for more information on how knife and Chef Infra Client use SSL certificates generated by the Chef Infra Server.
Private Certificate Authority
If an organization is using an internal certificate authority, then the
root certificate will not appear in any cacerts.pem file that ships by
default with operating systems and web browsers. Because of this, no
currently deployed system will be able to verify certificates that are
issued in this manner. To allow other systems to trust certificates from
an internal certificate authority, this root certificate will need to be
configured so that other systems can follow the chain of authority back
to the root certificate. (An intermediate certificate is not enough
because the root certificate is not already globally known.)
To use an internal certificate authority, append the server–optionally,
any intermediate certificate as well–and root certificates into a
single .crt file. For example:
cat server.crt [intermediate.crt] root.crt >> /var/opt/opscode/nginx/ca/FQDN.crt
Check your combined certificate’s validity on the Chef Infra Server:
openssl verify -verbose -purpose sslserver -CAfile cacert.pem /var/opt/opscode/nginx/ca/FQDN.crt
The cacert.pem should contain only your root CA’s certificate file. This
is not the usual treatment, but mimics how Chef Workstation behaves
after a knife ssl fetch followed by a knife ssl verify.
Intermediate Certificates
For use with 3rd party certificate providers, for example, Verisign.
To use an intermediate certificate, append both the server and
intermediate certificates into a single .crt file. For example:
cat server.crt intermediate.crt >> /var/opt/opscode/nginx/ca/FQDN.crt
Verify Certificate Was Signed by Proper Key
It’s possible that a certificate/key mismatch can occur during the CertificateSigningRequest (CSR) process. During a CSR, the original key for the server in question should always be used. If the output of the following commands don’t match, then it’s possible the CSR for a new key for this host was generated using a random key or a newly generated key. The symptoms of this issue will look like the following in the nginx log files:
nginx: [emerg] SSL_CTX_use_PrivateKey_file("/var/opt/opscode/nginx/ca/YOUR_HOSTNAME.key") failed (SSL: error:0B080074:x509 certificate routines:X509_check_private_key:key values mismatch)
Here’s how to tell for sure when the configured certificate doesn’t match the key
## openssl x509 -in /var/opt/opscode/nginx/ca/chef-432.lxc.crt -noout -modulus | openssl sha1
(stdin)= 05b4f62e52fe7ce2351ff81d3e1060c0cdf1fa24

## openssl rsa -in /var/opt/opscode/nginx/ca/chef-432.lxc.key -noout -modulus | openssl sha1
(stdin)= 05b4f62e52fe7ce2351ff81d3e1060c0cdf1fa24
To fix this, you will need to generate a new CSR using the original key for the server, the same key that was used to produce the CSR for the previous certificates. Install that new certificates along with the original key and the mismatch error should go away.
Regenerate Certificates
SSL certificates should be regenerated periodically. This is an important part of protecting the Chef Infra Server from vulnerabilities and helps to prevent the information stored on the Chef Infra Server from being compromised.
To regenerate SSL certificates:
Run the following command:
chef-server-ctl stopThe Chef Infra Server can regenerate them. These certificates will be located in
/var/opt/opscode/nginx/ca/and will be named after the FQDN for the Chef Infra Server. To determine the FQDN for the server, run the following command:hostname -fPlease delete the files found in the ca directory with names like this
$FQDN.crtand$FQDN.key.If your organization has provided custom SSL certificates to the Chef Infra Server, the locations of that custom certificate and private key are defined in
/etc/opscode/chef-server.rbas values for thenginx['ssl_certificate']andnginx['ssl_certificate_key']settings. Delete the files referenced in those two settings and regenerate new keys using the same authority.Run the following command, Chef server-generated SSL certificates will automatically be created if necessary:
chef-server-ctl reconfigureRun the following command:
chef-server-ctl start
Chef Infra Server Credentials Management
New in Chef Server 12.14: Chef Infra Server limits where it writes
service passwords and keys to disk. In the default configuration,
credentials are only written to files in /etc/opscode.
By default, Chef Infra Server still writes service credentials to
multiple locations inside /etc/opscode. This is designed to maintain
compatibility with add-ons. Chef Server 12.14 introduces the
insecure_addon_compat configuration option in
/etc/opscode/chef-server.rb, which allows you to further restrict
where credentials are written. insecure_addon_compat can be used if
you are not using add-ons, or if you are using the latest add-on
versions. Setting insecure_addon_compat to false writes credentials
to only one location: /etc/opscode/private-chef-secrets.json.
User-provided secrets (such as the password for an external PostgreSQL
instance) can still be set in /etc/opscode/chef-server.rb or via the
Secrets
Management
commands. These commands allow you to provide external passwords without
including them in your configuration file.
Add-on Compatibility
The following table lists which add-on versions support the more
restrictive insecure_addon_compat false setting. These version also
now require Chef Server 12.14.0 or greater:
| Add-on Name | Minimum Version |
|---|---|
| Chef Backend | all |
| Chef Manage | 2.5.0 |
| Push Jobs Server | 2.2.0 |
These newer add-ons will also write all of their secrets to
/etc/opscode/private-chef-secrets.json. Older versions of the add-ons
will still write their configuration to locations in /etc and
/var/opt.
/etc/opscode/private-chef-secrets.json
/etc/opscode/private-chef-secrets.json’s default permissions allow
only the root user to read or write the file. This file contains all of
the secrets for access to the Chef server’s underlying data stores and
thus access to it should be restricted to trusted users.
While the file does not contain passwords in plaintext, it is not safe to share with untrusted users. The format of the secrets file allows Chef Infra Server deployments to conform to regulations that forbid the appearance of sensitive data in plain text in configuration files; however, it does not make the file meaningfully more secure.
SSL Encryption Between Chef Infra Server and External PostgreSQL
New in Chef Infra Server 13.1.13: Chef Infra Server 13.1.13 introduces the ability to encrypt traffic between Chef Infra Server and an external PostgreSQL server over SSL. These instructions are not all-encompassing and assume some familiarity with PostgreSQL administration, configuration, and troubleshooting. Consult the PostgreSQL documentation for more information.
The following is a typical scenario for enabling encryption between a machine running Chef Infra Server and an external machine running PostgreSQL. Both machines must be networked together and accessible to the user.
Run the following command on both machines to gain root access:
sudo -iEnsure that OpenSSL is installed on the PostgreSQL machine.
Ensure that SSL support is compiled in on PostgreSQL. This applies whether you are compiling your own source or using a pre-compiled binary.
Place SSL certificates in the proper directories on the PostgreSQL machine and ensure they have correct filenames, ownerships, and permissions.
Enable SSL on PostgreSQL by editing the
postgresql.conffile. Setssl = onand specify the paths to the SSL certificates:ssl=on ssl_cert_file='/path/to/cert/file' ssl_key_file='/path/to/key/file'To prevent PostgreSQL from accepting non-SSL connections, edit
pg_hba.confon the PostgreSQL machine and change the relevant Chef Infra Server connections tohostssl.Here is a sample
pg_hba.conffile with hostssl connections for Chef Infra Server (the contents of yourpg_hba.confwill be different):# "local" is for Unix domain socket connections only local all all peer # IPv4 local connections: hostssl all all 127.0.0.1/32 md5 # IPv6 local connections: hostssl all all ::1/128 md5 # nonlocal connections hostssl all all 192.168.33.100/32 md5Restart PostgreSQL. This can typically be done with the following command on the PostgreSQL machine:
/path/to/postgresql/postgresql restartEdit
/etc/opscode/chef-server.rbon the Chef Infra Server and add the following line:postgresql['sslmode'] = 'require'Run reconfigure on the Chef Infra Server:
chef-server-ctl reconfigureVerify that SSL is enabled and that SSL connections are up between Chef Infra Server and your running PostgreSQL instance. One way to do this is to log into the PostgreSQL database from the Chef Infra Server by running
chef-server-ctl psqland then examine the SSL state using SQL queries.Start a psql session:
chef-server-ctl psql opscode_chefFrom the psql session, enter
postgres=# show ssl;which will show if ssl is enabled:postgres=# show ssl; ssl ----- on (1 row)Then enter
postgres=# select * from pg_stat_ssl;which will return true (t) in rows with SSL connections:postgres=# select * from pg_stat_ssl; pid | ssl | version | cipher | bits | compression | clientdn -------+-----+---------+-----------------------------+------+-------------+---------- 16083 | t | TLSv1.2 | ECDHE-RSA-AES256-GCM-SHA384 | 256 | f | 16084 | t | TLSv1.2 | ECDHE-RSA-AES256-GCM-SHA384 | 256 | f | 16085 | t | TLSv1.2 | ECDHE-RSA-AES256-GCM-SHA384 | 256 | f | 16086 | t | TLSv1.2 | ECDHE-RSA-AES256-GCM-SHA384 | 256 | f | 16087 | t | TLSv1.2 | ECDHE-RSA-AES256-GCM-SHA384 | 256 | f | 16088 | t | TLSv1.2 | ECDHE-RSA-AES256-GCM-SHA384 | 256 | f | 16089 | t | TLSv1.2 | ECDHE-RSA-AES256-GCM-SHA384 | 256 | f | 16090 | t | TLSv1.2 | ECDHE-RSA-AES256-GCM-SHA384 | 256 | f | 16091 | t | TLSv1.2 | ECDHE-RSA-AES256-GCM-SHA384 | 256 | f | 16092 | t | TLSv1.2 | ECDHE-RSA-AES256-GCM-SHA384 | 256 | f | 16093 | t | TLSv1.2 | ECDHE-RSA-AES256-GCM-SHA384 | 256 | f | 16094 | t | TLSv1.2 | ECDHE-RSA-AES256-GCM-SHA384 | 256 | f | 16095 | t | TLSv1.2 | ECDHE-RSA-AES256-GCM-SHA384 | 256 | f | 16096 | t | TLSv1.2 | ECDHE-RSA-AES256-GCM-SHA384 | 256 | f | 16097 | t | TLSv1.2 | ECDHE-RSA-AES256-GCM-SHA384 | 256 | f | 16098 | t | TLSv1.2 | ECDHE-RSA-AES256-GCM-SHA384 | 256 | f | 16099 | t | TLSv1.2 | ECDHE-RSA-AES256-GCM-SHA384 | 256 | f | 16100 | t | TLSv1.2 | ECDHE-RSA-AES256-GCM-SHA384 | 256 | f | 16101 | t | TLSv1.2 | ECDHE-RSA-AES256-GCM-SHA384 | 256 | f | 16102 | t | TLSv1.2 | ECDHE-RSA-AES256-GCM-SHA384 | 256 | f | 16119 | f | | | | | (21 rows)
Key Rotation
See the chef-server-ctl key rotation commands for more information about user key management.
Server Tuning
The server configuration file contains a list of all configuration options that are available for the Chef Infra Server. Some of these values should be modified for large-scale installations.
Note
Customize the Config File
The /etc/opscode/chef-server.rb file contains all of the non-default
configuration settings used by the Chef Infra Server. The default
settings are built into the Chef Infra Server configuration and should
only be added to the chef-server.rb file to apply non-default values.
These configuration settings are processed when the
chef-server-ctl reconfigure command is run. The chef-server.rb file
is a Ruby file, which means that conditional statements can be used
within it.
Use Conditions
Use a case statement to apply different values based on whether the
setting exists on the front-end or back-end servers. Add code to the
server configuration file similar to the following:
role_name = ChefServer['servers'][node['fqdn']]['role']
case role_name
when 'backend'
  # backend-specific configuration here
when 'frontend'
  # frontend-specific configuration here
end
Recommended Settings
The following settings are typically added to the server configuration file (no equal sign is necessary to set the value):
api_fqdnThe FQDN for the Chef Infra Server. This setting is not in the server configuration file by default. When added, its value should be equal to the FQDN for the service URI used by the Chef Infra Server. For example:
api_fqdn "chef.example.com".bootstrapDefault value:
true.ip_versionUse to set the IP version:
"ipv4"or"ipv6". When set to"ipv6", the API listens on IPv6 and front end and back end services communicate via IPv6 when a high availability configuration is used. When configuring for IPv6 in a high availability configuration, be sure to set the netmask on the IPv6backend_vipattribute. Default value:"ipv4".notification_emailDefault value:
info@example.com.
SSL Protocols
The following settings are often modified from the default as part of the tuning effort for the nginx service and to configure the Chef Infra Server to use SSL certificates:
nginx['ssl_certificate']The SSL certificate used to verify communication over HTTPS. Default value:
nil.nginx['ssl_certificate_key']The certificate key used for SSL communication. Default value:
nil.nginx['ssl_ciphers']The list of supported cipher suites that are used to establish a secure connection. To favor AES256 with ECDHE forward security, drop the
RC4-SHA:RC4-MD5:RC4:RSAprefix. For example:nginx['ssl_ciphers'] = "HIGH:MEDIUM:!LOW:!kEDH: \ !aNULL:!ADH:!eNULL:!EXP: \ !SSLv2:!SEED:!CAMELLIA: \ !PSK"nginx['ssl_protocols']The SSL protocol versions that are enabled. SSL 3.0 is supported by the Chef Infra Server; however, SSL 3.0 is an obsolete and insecure protocol. Transport Layer Security (TLS)—TLS 1.0, TLS 1.1, and TLS 1.2—has effectively replaced SSL 3.0, which provides for authenticated version negotiation between Chef Infra Client and Chef Infra Server, which ensures the latest version of the TLS protocol is used. For the highest possible security, it is recommended to disable SSL 3.0 and allow all versions of the TLS protocol. For example:
nginx['ssl_protocols'] = 'TLSv1 TLSv1.1 TLSv1.2'
Note
See https://www.openssl.org/docs/man1.0.2/man1/ciphers.html for more
information about the values used with the nginx['ssl_ciphers'] and
nginx['ssl_protocols'] settings.
For example, after copying the SSL certificate files to the Chef Infra
Server, update the nginx['ssl_certificate'] and
nginx['ssl_certificate_key'] settings to specify the paths to those
files, and then (optionally) update the nginx['ssl_ciphers'] and
nginx['ssl_protocols'] settings to reflect the desired level of
hardness for the Chef Infra Server:
nginx['ssl_certificate'] = '/etc/pki/tls/private/name.of.pem'
nginx['ssl_certificate_key'] = '/etc/pki/tls/private/name.of.key'
nginx['ssl_ciphers'] = 'HIGH:MEDIUM:!LOW:!kEDH:!aNULL:!ADH:!eNULL:!EXP:!SSLv2:!SEED:!CAMELLIA:!PSK'
nginx['ssl_protocols'] = 'TLSv1 TLSv1.1 TLSv1.2'
Optional Services Tuning
The following settings are often used to for performance tuning of the Chef Infra Server in larger installations.
Note
When changes are made to the chef-server.rb file the Chef Infra Server must be reconfigured by running the following command:
chef-server-ctl reconfigure
bookshelf
The following setting is often modified from the default as part of the tuning effort for the bookshelf service:
bookshelf['vip']The virtual IP address. Default value:
node['fqdn'].
opscode-erchef
The following settings are often modified from the default as part of the tuning effort for the opscode-erchef service:
opscode_erchef['db_pool_size']The number of open connections to PostgreSQL that are maintained by the service. If failures indicate that the opscode-erchef service ran out of connections, try increasing the
postgresql['max_connections']setting. If failures persist, then increase this value (in small increments) and also increase the value forpostgresql['max_connections']. Default value:20.opscode_erchef['s3_url_ttl']The amount of time (in seconds) before connections to the server expire. If Chef Infra Client runs are timing out, increase this setting to
3600, and then adjust again if necessary. Default value:900.opscode_erchef['strict_search_result_acls']Use to specify that search results only return objects to which an actor
(user, client, etc.) has read access, as determined by ACL settings.
This affects all searches. When true, the performance of the Chef
management console may increase because it enables the Chef management
console to skip redundant ACL checks. To ensure the Chef management
console is configured properly, after this setting has been applied with
a chef-server-ctl reconfigure run chef-manage-ctl reconfigure to
ensure the Chef management console also picks up the setting. Default
value: false.
Warning
When true, opscode_erchef['strict_search_result_acls'] affects all
search results and any actor (user, client, etc.) that does not have
read access to a search result will not be able to view it. For example,
this could affect search results returned during a Chef Infra Client
runs if a Chef Infra Client does not have permission to read the
information.
postgresql
The following setting is often modified from the default as part of the tuning effort for the postgresql service:
postgresql['max_connections']The maximum number of allowed concurrent connections. This value should only be tuned when the
opscode_erchef['db_pool_size']value used by the opscode-erchef service is modified. Default value:350. If there are more than two front end machines in a cluster, thepostgresql['max_connections']setting should be increased. The increased value depends on the number of machines in the front end, but also the number of services that are running on each of these machines.- Each front end machine always runs the oc_bifrost and opscode-erchef services.
- The Reporting add-on adds the reporting service.
- The Chef Push Jobs service adds the push_jobs service.
Each of these services requires 25 connections, above the default value.
Use the following formula to help determine what the increased value should be:
new_value = current_value + [
            (# of front end machines - 2) * (25 * # of services)
         ]
For example, if the current value is 350, there are four front end machines, and all add-ons are installed, then the formula looks like:
550 = 350 + [(4 - 2) * (25 * 4)]
Backup and Restore a Standalone or Frontend install
Periodic backups of Chef Infra Server data are an essential part of managing and maintaining a healthy configuration and ensuring that important data can be restored, if required.
chef-server-ctl
For the majority of use cases, chef-server-ctl backup is the
recommended way to take backups of the Chef Infra Server. Use the
following commands for managing backups of Chef Infra Server data, and
for restoring those backups.
backup
The backup subcommand is used to back up all Chef Infra Server data.
This subcommand:
- Requires rsync to be installed on the Chef Infra Server prior to running the command
- Requires a
chef-server-ctl reconfigureprior to running the command - Should not be run in a Chef Infra Server configuration with an external PostgreSQL database; use knife ec backup instead
- Puts the initial backup in the
/var/opt/chef-backupdirectory as a tar.gz file; move this backup to a new location for safe keeping
Options
This subcommand has the following options:
-y,--yesUse to specify if the Chef Infra Server can go offline during tar.gz-based backups.
Syntax
This subcommand has the following syntax:
chef-server-ctl backup
restore
The restore subcommand is used to restore Chef Infra Server data from
a backup that was created by the backup subcommand. This subcommand
may also be used to add Chef Infra Server data to a newly-installed
server. This subcommand:
- Requires rsync to be installed on the Chef Infra Server prior to running the command
- Requires a
chef-server-ctl reconfigureprior to running the command - Should not be run in a Chef Infra Server configuration with an external PostgreSQL database; use knife ec backup instead
Options
This subcommand has the following options:
-c,--cleanseUse to remove all existing data on the Chef Infra Server; it will be replaced by the data in the backup archive.
-d DIRECTORY,--staging-dir DIRECTORYUse to specify that the path to an empty directory to be used during the restore process. This directory must have enough disk space to expand all data in the backup archive.
Syntax
This subcommand has the following syntax:
chef-server-ctl restore PATH_TO_BACKUP (options)
Examples
chef-server-ctl restore /path/to/tar/archive.tar.gz
Backup and restore a Chef Backend install
In a disaster recovery scenario, the backup and restore processes allow you to restore a data backup into a newly built cluster. It is not intended for the recovery of an individual machine in the chef-backend cluster or for a point-in-time rollback of an existing cluster.
Backup
Restoring your data in the case of an emergency depends on having previously made backups of:
- the data in your Chef Backend cluster
- the configuration from your Chef server
To make backups for future use in disaster scenarios:
- On a follower chef-backend node, run
chef-backend-ctl backup - On a Chef Infra Server node run:
chef-server-ctl backup --config-only - Move the tar archives created in steps (1) and (2) to a long-term storage location.
Restore
To restore a Chef Backend-based Chef Infra Server cluster:
Restore the node and an IP address that can be used to reach the node on the first machine that you want to use in your new Chef Backend cluster. The argument to the
--publish_addressoption should be the IP address for reaching the node you are restoring.chef-backend-ctl restore --publish_address X.Y.Z.W /path/to/backup.tar.gzJoin additional nodes to your Chef Backend cluster. (If you are only testing and verifying your restore process you can test against a single Chef Backend node and a single Chef Infra Server node.)
chef-backend-ctl join-cluster IP_OF_FIRST_NODE --publish_address IP_OF_THIS_NODERestore Chef Infra Server from your backed up Infra Server configuration (See step 2 in the backup instructions above). Alternatively, you can generate new configuration for this node and reconfigure it using the steps found in the installation instructions..
chef-server-ctl restore /path/to/chef-server-backup.tar.gzRun the
reindexcommand to re-populate your search indexchef-server-ctl reindex --all
Verify
We recommend periodically verifying your backup by restoring a single Chef Backend node, a single Chef Infra Server node, and ensuring that various knife commands and Chef Infra Client runs can successfully complete against your backup.